 Bitcoin Staking onboarding docs
01 / 06 · Prepare the vault
Get your vault account ready for enrollment.
Who: the operator with access to the Fireblocks workspace. Keep the approvers required by your Transaction Authorization Policy available for the signing steps later.
This step confirms your approved values and opens the correct vault account in the Fireblocks x Stacks app.
Before you begin
- You have received your Enrollment Record from the Stacks Endowment. It shows the approved bond, amounts, reward asset, and signer-manager.
- The Fireblocks x Stacks desktop app is installed and connected to your workspace. The app guides you through creating or importing Fireblocks API credentials. Your Fireblocks Customer Success Manager provides the app and setup instructions.
- Raw Signing is enabled in your workspace. It is a premium Fireblocks feature. Request it from your Fireblocks Customer Success Manager well before the enrollment session.
- A Transaction Authorization Policy rule allows Raw Signing for the vault account you are enrolling.
- You submitted the vault account's Stacks and Bitcoin addresses at stacksendowment.co/bond-enroll and received written confirmation that they are whitelisted for this bond.
- Your Stacks Endowment contact is available during the enrollment session.
Open the app and select your vault account
- Open the Fireblocks x Stacks app. Touch ID unlocks your stored credentials. It is not a transaction approval.
- On the dashboard, find the vault account approved for this bond. The dashboard lists each vault account with its Stacks balances.
- Select the vault account. Confirm that its complete Stacks address exactly matches the address you submitted for whitelisting. If it does not match, stop and select the correct vault account.
- Confirm the app shows Mainnet. The app must not say it is viewing a test network.
- Open Staking in the sidebar and select the same vault account in the account picker.
Make sure the vault account has enough funds
- The Bitcoin balance must cover the approved BTC amount shown in the Enrollment Record, plus the Bitcoin network fee.
- The STX balance must cover the STX requirement shown in the Enrollment Record, plus the Stacks transaction fee.
- If either balance is too low, deposit funds through Fireblocks and wait for the deposit to confirm before continuing.
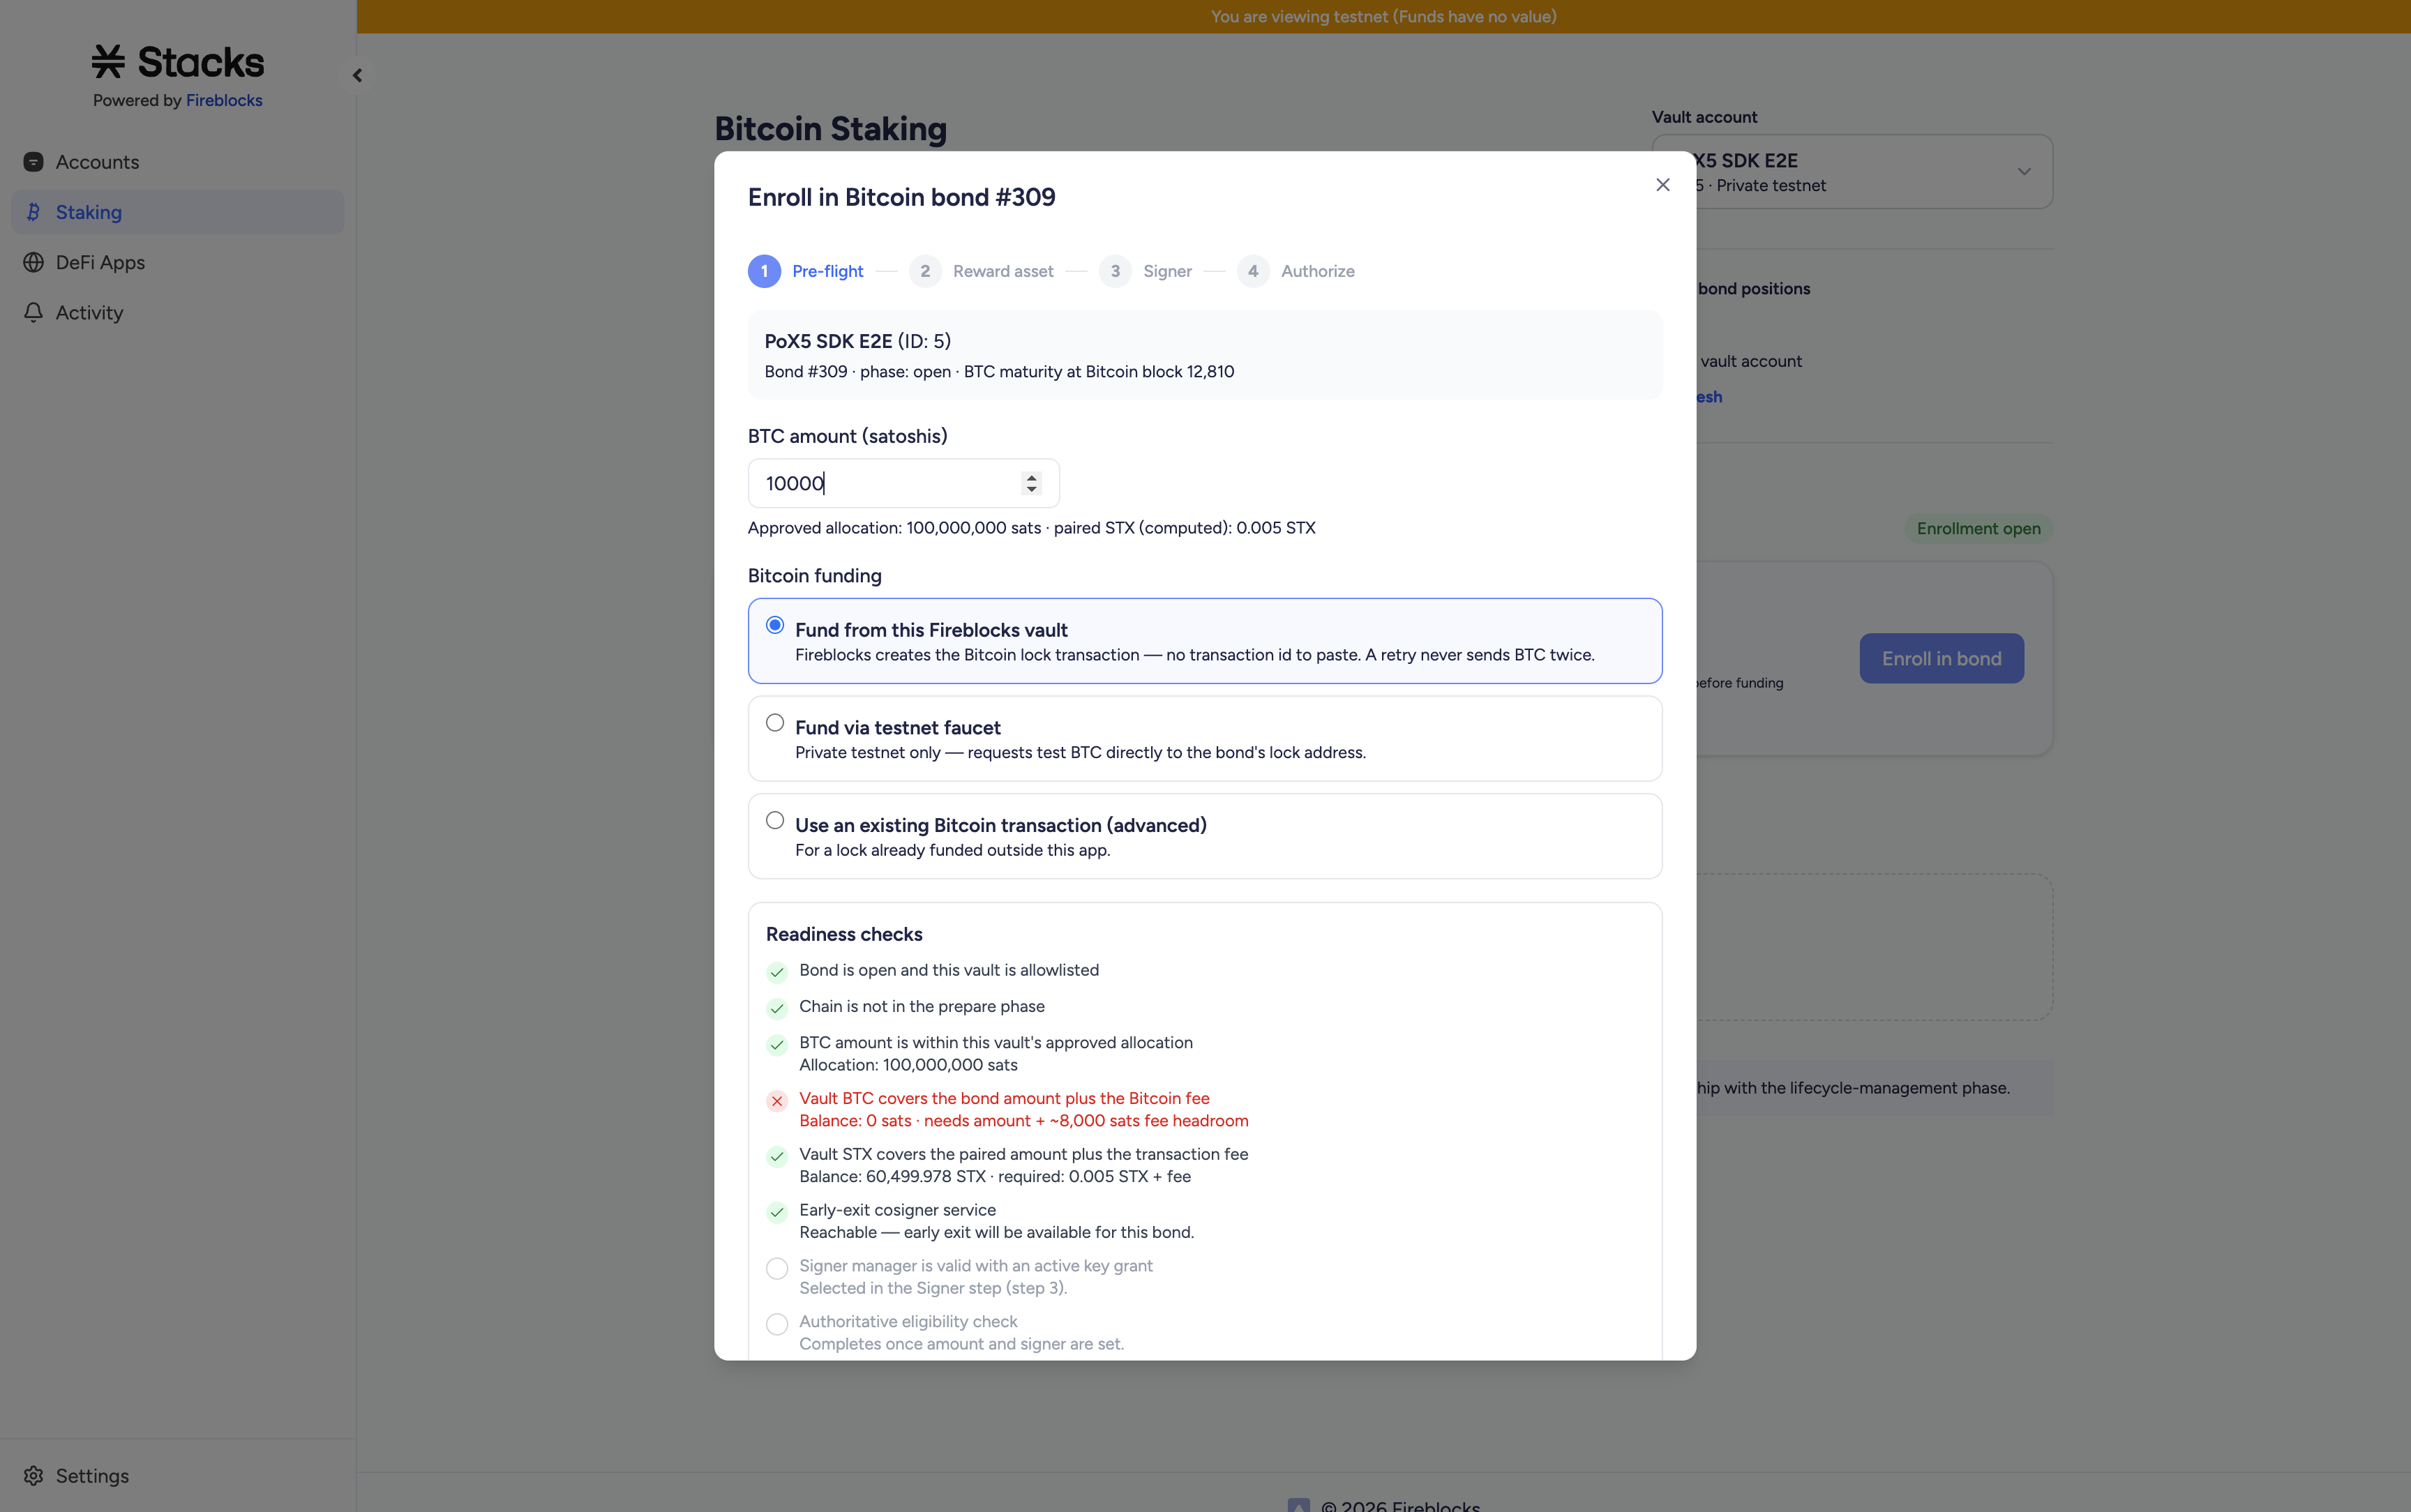
02 / 06 · Start enrollment
Start enrollment and set the Bitcoin amount.
Who: the operator. The pre-flight screen checks that your account is ready before anything is signed.
Nothing moves in this step. The app only checks balances, access, and the bond phase.
- On the bond card, select Enroll in bond.
- Enter the BTC amount approved in the Enrollment Record.
- Under Bitcoin funding, keep Fund from this Fireblocks vault selected. Fireblocks creates the Bitcoin lock transaction for you. There is no transaction ID to paste.
- Review the readiness checks. Every check must pass before you continue.
- Confirm that the displayed STX requirement matches the Enrollment Record.
- Select Continue.
03 / 06 · Reward asset
Choose how you will receive rewards.
Who: the operator. The reward asset is the asset in which this bond's rewards will be paid.
The choice was made before this session and appears in the Enrollment Record.
- Select the reward asset listed in the Enrollment Record.
- If the Record lists sBTC, rewards arrive at your vault account's Stacks address. No other setting is needed.
- If the Record lists native BTC, select the reward destination vault account your organization approved in writing.
- Confirm the verified destination address against that written approval.
- Enter the per-cycle withdrawal fee budget your organization approved, in satoshis.
- Read the payout explanation shown for your selection. Stop if it differs from the Enrollment Record.
- Select Continue.
04 / 06 · Signer-manager
Confirm the signer-manager.
Who: the operator. A signer-manager is a smart contract that validates your bond and distributes your rewards.
The Stacks Labs signer-manager is selected by default. It is the only one offered unless you add your own. Most partners keep the default. Confirm it matches the Enrollment Record.
- Confirm the Stacks Labs signer-manager is selected. Compare its full contract address with the Enrollment Record character by character, including the name after the dot.
- Wait for the app's signer-manager checks to pass. Both checks must pass.
- Only if your Enrollment Record names a custom signer-manager: select Enter a different manager…, paste the full contract address from the Record, and select Add manager. Do not type it by hand. The app validates it for this enrollment only and does not save it.
- If anything is different or unclear, stop and contact your Stacks Endowment contact before continuing.
- Select Continue.
06 / 06 · Verify enrollment
Confirm that the bond registration succeeded.
Who: the operator. Enrollment is complete only after the Stacks registration transaction is confirmed and successful.
The position card is your ongoing view of the bond.
- On the Staking page, confirm that Your position now shows the bond.
- Compare the bond number, BTC amount, STX amount, reward asset, and signer-manager with the Enrollment Record. Compare the maturity with the Authorize summary you reviewed.
- Open the Stacks transaction from the success screen or the position card. Confirm the explorer reports Success. Confirmed alone is not enough.
- Confirm the locked amount on a Bitcoin block explorer using the Bitcoin transaction ID. The explorer shows the amount that actually funded the lock.
- Save both transaction IDs with your records.
- Tell your Stacks Endowment contact that enrollment is complete.
If something goes wrong
The bond card says access is required
Your vault account has not been approved for that bond. Compare the complete Stacks address with the written whitelisting confirmation. Contact your Stacks Endowment contact if they match but access is still missing.
A readiness check does not pass
Read the message under the failed check. Most failures are a balance that is too low or a bond that is not open yet. Fix the cause and select Refresh.
The signer-manager checks do not pass
Confirm the selected signer-manager matches the Enrollment Record. If you entered a custom one, confirm you pasted the full contract address exactly as shown in the Record. If it is correct and a check still fails, the signer-manager may not be accepting enrollments. Contact your Stacks Endowment contact before continuing.
The reward destination address was rejected
Re-select the destination vault account in the app instead of typing an address. If it is still refused, contact your Stacks Endowment contact.
The signature request fails or never reaches an approver
Raw Signing may be disabled or your Transaction Authorization Policy may not allow it for this vault account. Contact your Fireblocks Customer Success Manager.
A cycle paid out as sBTC instead of Bitcoin
This is expected when the cycle's reward is at or below the threshold shown at enrollment. The rewards are not lost. They arrive at your Stacks address.
The app closed during enrollment
Reopen the app and run enrollment for the same bond again. The app resumes the existing enrollment. Do not send Bitcoin manually.
The signing request was not approved
Check the Fireblocks mobile app or your cosigner. The request must be approved per your Transaction Authorization Policy before the app can continue. If the Touch ID prompt was missed or cancelled, nothing was sent. Select Authorize enrollment again.
Bitcoin confirmed but Stacks registration is pending or failed
Do not repeat the Bitcoin step. Save both transaction IDs, the bond number, and the error message, then contact your Stacks Endowment contact immediately.